Yealink: Perform A Firmware Update
Table of Contents
Scope
The following article will show you how to perform a Firmware update on a Yealink phone from the Web GUI as well as via override. The following article will show you how to perform a firmware update on Yealink phones. The following steps were tested with a Yealink T5X series phones, the Web GUI may differ for older models but the steps remain the same.
Requirements
- Access to Manager Portal
- Access to phone Web GUI
- Firmware File you would like to use
Warning
Only the firmware provided by NDP has been tested for full functionality. Generally, you only should upgrade firmware to resolve a certain issue or address a specific security concern. Otherwise, you should not upgrade firmware unless instructed to do so by support.
Updating Device Firmware via Web GUI
- Download the Firmware file for the version you are upgrading to from http://support.yealink.com/
- Log in to the Web Gui by accessing the IP address of the phone via any web browser
- Once logged in go to the Settings drop-down menu and click on Upgrade.

- Once there click on Browse

- Locate the firmware file, select it and click on Open
- Click on Upload

- Click on OK

Updating Firmware Via Override
- Log in to the Manager Portal
- Once there navigate to Inventory > Phone Hardware
- Click on the Edit icon next to the phone you are performing the update on

- Click on the Advanced tab
- Under Overrides, enter the following:
- Firmware version: x.80.x.x and later:
- static.firmware.url="<Firmware File Url>"
- Firmware version: x.79.x.x and prior:
- firmware.url="<Firmware File Url>"
- Firmware version: x.80.x.x and later:
- Once added, click on the arrow next to Save and click on Save and Resync

- The phone should automatically reboot and perform the update. If you don't see it reboot then go ahead and reboot it manually.
Upgrade from 3CX Firmware
Phones running firmware version xx.83.0.55 need to be step upgraded in order to run their most recent firmware. You can download this firmware from the following URL:
https://drive.google.com/drive/folders/1CsH1BPtYRjCQDma3ogBDu_RxyxlyStBO?usp=sharing
Once this firmware has been installed, you will be able to upgrade the phone normally.
Upgrade from Verizon One Talk
To get a Verizon One Talk Yealink provisioned with the PBX, it must be on compatible firmware. Compatible firmware is publicly available. Verizon uses a proprietary firmware that forces it to provision with their platform, outside of the YMCS or RPS platforms that Yealink offers. The steps below are what worked for us, however, it is possible that similar steps could work, depending on the firmware version of the Verizon One Talk Yealink device.
First, we must get the Verizon One Talk Yealink off of its proprietary firmware. Here's how:
-
If you have an AC Adapter with an Ethernet cable, unplug the Ethernet cable to cut the device's internet.
If using PoE power, your situation may be more complex. You need to find a way to make the device be on the local network without reaching out to the public internet. Blocking it's internet access using Firewall rules, or simply making its DHCP lease have improper DNS could work here. - Hold the OK button for 7-10 seconds until the Factory Reset? screen appears. Select OK
- When the phone comes back on, navigate into Menu > Advanced > Network.
In this menu, we have 2 steps to take:- Go into Web Server, here, you will find that the HTTP Status is set to Disabled, set it to Enabled, and press Save. After saving, it will prompt you to reboot, but you do not need to here, you can safely press cancel, and it will save the setting.
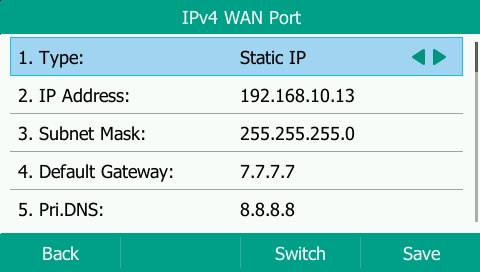
- Now, go into the WAN Port option, followed by the IPv4 option. Here we should see the Type set to DHCP. We are going to set it to Static and enter the following settings:
- IP Address: Set this to a valid IPv4 Address on your network, the IP address the phone had before factory resetting should work for our short time needing this setting.
- Subnet Mask: 255.255.255.0
-
Default Gateway: 7.7.7.7
- This setting in the Gateway intentionally breaks the internet access of the device while keeping local connectivity.
-
For Example: [b838a7b4-54d8-4ca8-8402-903f4f6146aa]
When you save the "WAN Port" settings, it will prompt you to reboot, you can reboot now.
- Upon fully booting, the phone may show connectivity errors, that is okay and expected for this process.
- Plug in your ethernet cable again.
- Navigate to the IP address of the phone that was set in a browser.
- In the browser, we may now follow the steps shown at the top of this document Yealink: Perform A Firmware Update (voipdocs.io).
Note: We found on T46S models that upgrading to the newest firmware would fail, however, upgrading to 66.85.0.5 worked. - Now that the phone is on the new firmware, you may update to an even newer version, or factory reset the device once more by holding down the OK button.
- Once factory reset, the device will now reach out to YMCS/RPS for provisioning, or you may follow a manual provisioning process.
Yealink Recovery Firmware
Yealink provides recovery firmware for many of its devices. These should only be used as an absolute, last resort and could result in bricking the phone. Do not use these unless advised by support to do so.
https://support.888voip.com/article/280-how-to-use-the-tftp-recovery-mode-on-yealink-devices